

JWT templates
Clerk offers the ability to generate JSON Web Tokens(opens in a new tab) (JWTs) representing users that are signed in to your application. Clerk provides the ability to extend this functionality by allowing you to customize the contents of these tokens through JWT Templates. This enables you to integrate with any third-party services that support authentication with JWTs.
JWTs can be generated from your frontend using Clerk.js. Each token depicts a user who is authenticated to your application. Tokens can only be generated for signed in users and each token is tied to a particular user.
Tokens are cryptographically signed with your instance's private key and can be verified using its public key, which can be fetched from your instance's JWKS endpoint, typically https://clerk.your-site.com/.well-known/jwks.json.
With JWT Templates, you can control the claims that will go into these tokens by defining custom templates that fit your needs. An example use case is integrating with a third-party service that is able to consume JWTs, but requires them to be in a particular format.
At a glance, the process for creating and using a template is the following:
- In the Clerk Dashboard, create a JWT template from the JWT Templates(opens in a new tab) page.
- From your frontend, generate tokens using that template.
The following sections will dive into these steps and explore what you can achieve with JWT Templates.
Template basics
Templates are essentially JSON objects that specify claims to be included in the generated tokens, along with their respective values.
Claim values can be either static or dynamic. Static values can be any of the regular JSON data types (strings, numbers, booleans, arrays, objects, null) and will be included as-is in the tokens. Dynamic values, also called shortcodes, are special strings that will be substituted for their actual values when the tokens are generated.
Example of a template that specifies both static values and shortcodes:
{ "aud": "https://example.com", "interests": ["hiking", "knitting"], "name": "{{user.first_name}}", "surname": "{{user.last_name}}", "email": "{{user.primary_email_address}}" }
In this example, the values of the aud and interests claims are static. The values of the name and email claims are dynamic.
A token generated using the template above, would look roughly like this:
{
  "aud": "https://example.com",
  "interests": ["hiking", "knitting"],
  "name": "John",
  "surname": null,
  "email": "john@doe.org"
  // ...plus some automatically-included claims; more on that below
}
Default claims
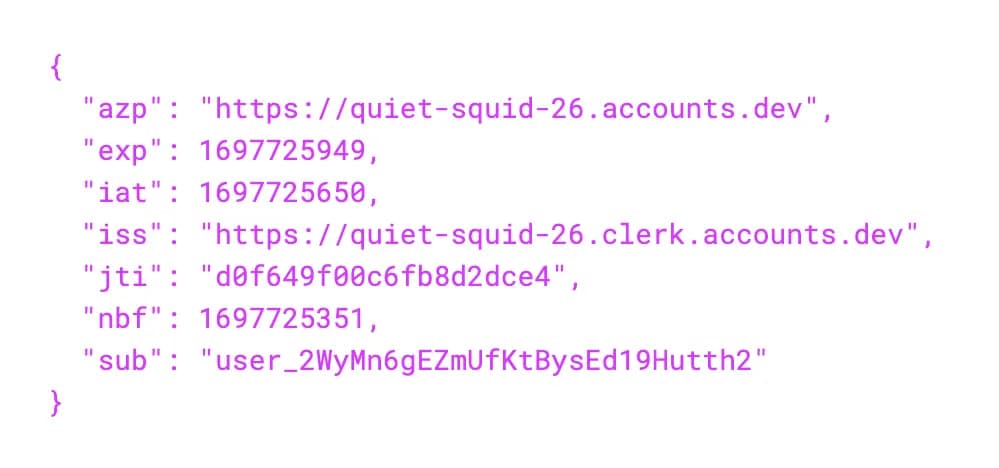
In the previous example, "automatically-included claims" was briefly mentioned. Besides the claims specified by the template, there are certain claims that are automatically included in all tokens and cannot be overridden by templates. Clerk calls these "default claims" and they are the following:
azp: authorized party - theOriginheader that was included in the original Frontend API request made from the user. Most commonly, it will be the URL of the application (e.g.https://example.com). This claim could be omitted if, for privacy-related reasons,Originis empty or null.exp: expiration time - the time after which the token will expire, as a Unix timestamp. Determined using the Token lifetime JWT template setting in the Clerk Dashboard(opens in a new tab).iat: issued at - the time at which the token was issued, as a Unix timestamp (e.g.1516239022).iss: issuer - the Frontend API URL of your instance (e.g.https://clerk.your-site.com).jti: JWT ID - a random alphanumeric string, used as a unique identifier for the token.nbf: not before - the time before which the token is considered invalid, as a Unix timestamp. Determined using the Allowed Clock Skew JWT template setting in the Clerk Dashboard(opens in a new tab).sub: subject - the ID of the current user of the session (e.g.user_123).
Many of these are standard claims registered by IANA. For generic information about them, refer to RFC 7519(opens in a new tab).
Shortcodes
To include dynamic data in a token, you can use shortcodes. Shortcodes are special strings that are substituted for their corresponding values during token generation. They are typically used to refer to data that depend on the currently authenticated user.
Shortcodes are strings of the form {{some.identifier}} and they can be used in place of values (but not keys).
The available shortcodes are the following:
Even though in templates, shortcodes are string values, their type in the generated token depends on the original type of the information that's included. For example, {{user.public_metadata}} will be substituted for a JSON object, not a string.
| Shortcode | Description | Type | Example |
|---|---|---|---|
{{user.id}} | The user's unique identifier in Clerk. | string | user_abc123bcde |
{{user.first_name}} | The user's first name, if provided. | string | null | John |
{{user.last_name}} | The user's last name, if provided. | string | null | Doe |
{{user.full_name}} | The user's full name, if provided. | string | null | John Doe |
{{user.username}} | The user's username. | string | null | johndoe |
{{user.external_id}} | The user's external ID. | string | null | abcdef1234 |
{{user.created_at}} | Date and time when the user has signed up to the instance, as a Unix timestamp. | number | 1640104791 |
{{user.updated_at}} | Date and time when the user was last updated, as a Unix timestamp. | number | 1640104748 |
{{user.primary_email_address}} | The user's primary email, if provided. | string | null | john@example.com |
{{user.primary_phone_number}} | The user's primary phone, if provided. | string | null | +12025550188 |
{{user.email_verified}} | Whether the user has a verified email address tied to their account. | boolean | true |
{{user.phone_number_verified}} | Whether the user has a verified phone number tied to their account. | boolean | false |
{{user.image_url}} | The user's avatar image URL. If not provided, the default avatar is used. | string | https://img.clerk.com/eyJ0eXBlIjoiZGVmYXVsdCIsImlpZCI6Imluc194eHh4eHh4eHh4eHh4eHh4eHh4eHh4eHh4eHgiLCJyaWQiOiJ1c2VyX3h4eHh4eHh4eHh4eHh4eHh4eHh4eHh4eHh4eCJ |
{{user.two_factor_enabled}} | Denotes if the user has enabled Multifactor for their account. | boolean | true |
{{user.public_metadata}} | The user's metadata object. To retrieve specific attributes, see Metadata. | object | {"interests": ["hiking", "knitting"] } |
{{user.unsafe_metadata}} | The user's metadata object. To retrieve specific attributes, see Metadata. | object | {} |
{{org.id}} | The id of the user's active organization for the current session. | string | org_abc123bcde |
{{org.role}} | The role the user has in the active organization for the current session. | string | admin |
{{org.name}} | The name of the user's active organization for the current session. | string | My Org |
{{org.slug}} | The slug of the user's active organization for the current session. | string | my-org-slug |
{{org.public_metadata}} | The user's active organization public metadata for the current session. To retrieve specific attributes, see Metadata. | object | {} |
{{org_membership.public_metadata}} | The user's active organization membership public metadata for the current session. To retrieve specific attributes, see Metadata. | object | {} |
{{org_membership.permissions}} | The user's active organization membership permissions for the current session. | string[] | ['org:article:publish'] |
If you need something that is missing from this list, please do not hesitate to contact us(opens in a new tab).
Metadata
While you can use {{user.public_metadata}} or {{user.unsafe_metadata}} to include the complete metadata object in the final token, there might be cases where you only need a specific piece of information.
To keep your tokens lean, there is a syntax you can use to do just that.
Let's assume the user's public metadata are the following:
{
  "interests": ["hiking", "knitting"],
  "addresses": {
    "Home": "2355 Pointe Lane, 56301 Minnesota",
    "Work": "3759 Newton Street, 33487 Florida"
  }
}
To access the interests array, you would use the shortcode {{user.public_metadata.interests}}. To access the Home address, you would use {{user.public_metadata.addresses.Home}}.
An example follows:
// template
{
  "likes_to_do": "{{user.public_metadata.interests}}",
  "shipping_address": "{{user.public_metadata.addresses.Home}}"
}

// actual token
{
  "likes_to_do": ["hiking", "knitting"],
  "shipping_address": "2355 Pointe Lane, 56301 Minnesota"
}
Using the same notation (.), you can fetch data from nested fields of arbitrary depth. The examples above use public metadata, but the same notation works for unsafe metadata as well.
The same syntax works also for organization and organization membership metadata fields.
Future extensions to the template language may provide more ways to query for specific data. Until then, please contact us(opens in a new tab) if you need something that is not currently supported.
Interpolation
Shortcodes can be interpolated inside strings.
For example, you could use interpolation to build the user's full name:
{
  "full_name": "{{user.last_name}} {{user.first_name}}"
}
Interpolated shortcodes will always result to string values. For example, if the user does not have a last name associated, the above full name value would be "null John".
Conditional expressions
Conditional expressions use the || operator and can be used to substitute a default fallback value for shortcodes that would otherwise result in null or false values.
The format of a conditional expression is the following:
{
  "key": "{{ <operand_1> || <operand_2> || <operand_n> }}"
}
As an example, given the following template (comments added for clarity):
{
  "has_contact_info": "{{user.has_verified_email || user.has_verified_phone}}",

  // fallback to a string value
  "full_name": "{{user.full_name || 'Awesome User'}}",

  // fallback to a number value
  "age": "{{user.public_metadata.age || user.unsafe_metadata.age || 30 }}"
}
and given a user that:
- has verified their phone number
- has not verified their email
- has not provided their first or last name
- does not have any public or unsafe metadata assigned
the output of the template after substitution would be:
{
  "has_verified_contact_info": true,
  "full_name": "Awesome User",
  "age": 30
}
The result of a conditional expression is that of the first operand that does not evaluate to null or false (also known as "falsy"). If all operands of the expression are falsy, the last operand is returned no matter its value.
Conditional expressions can also be combined with interpolation:
{
  "greeting": "Awesome {{user.first_name || user.last_name || 'user'}}"
}
Assuming a user that has no first or last name set in their profile, the above would output:
{
  "greeting": "Awesome user"
}
Following are the rules that govern conditional expressions:
- the result of an expression is either the first operand that is not falsy, or the last operand (no matter its value)
- string literals should use single quotes (
') - only strings, booleans and numbers are permitted as literal (i.e. non-shortcodes) operands
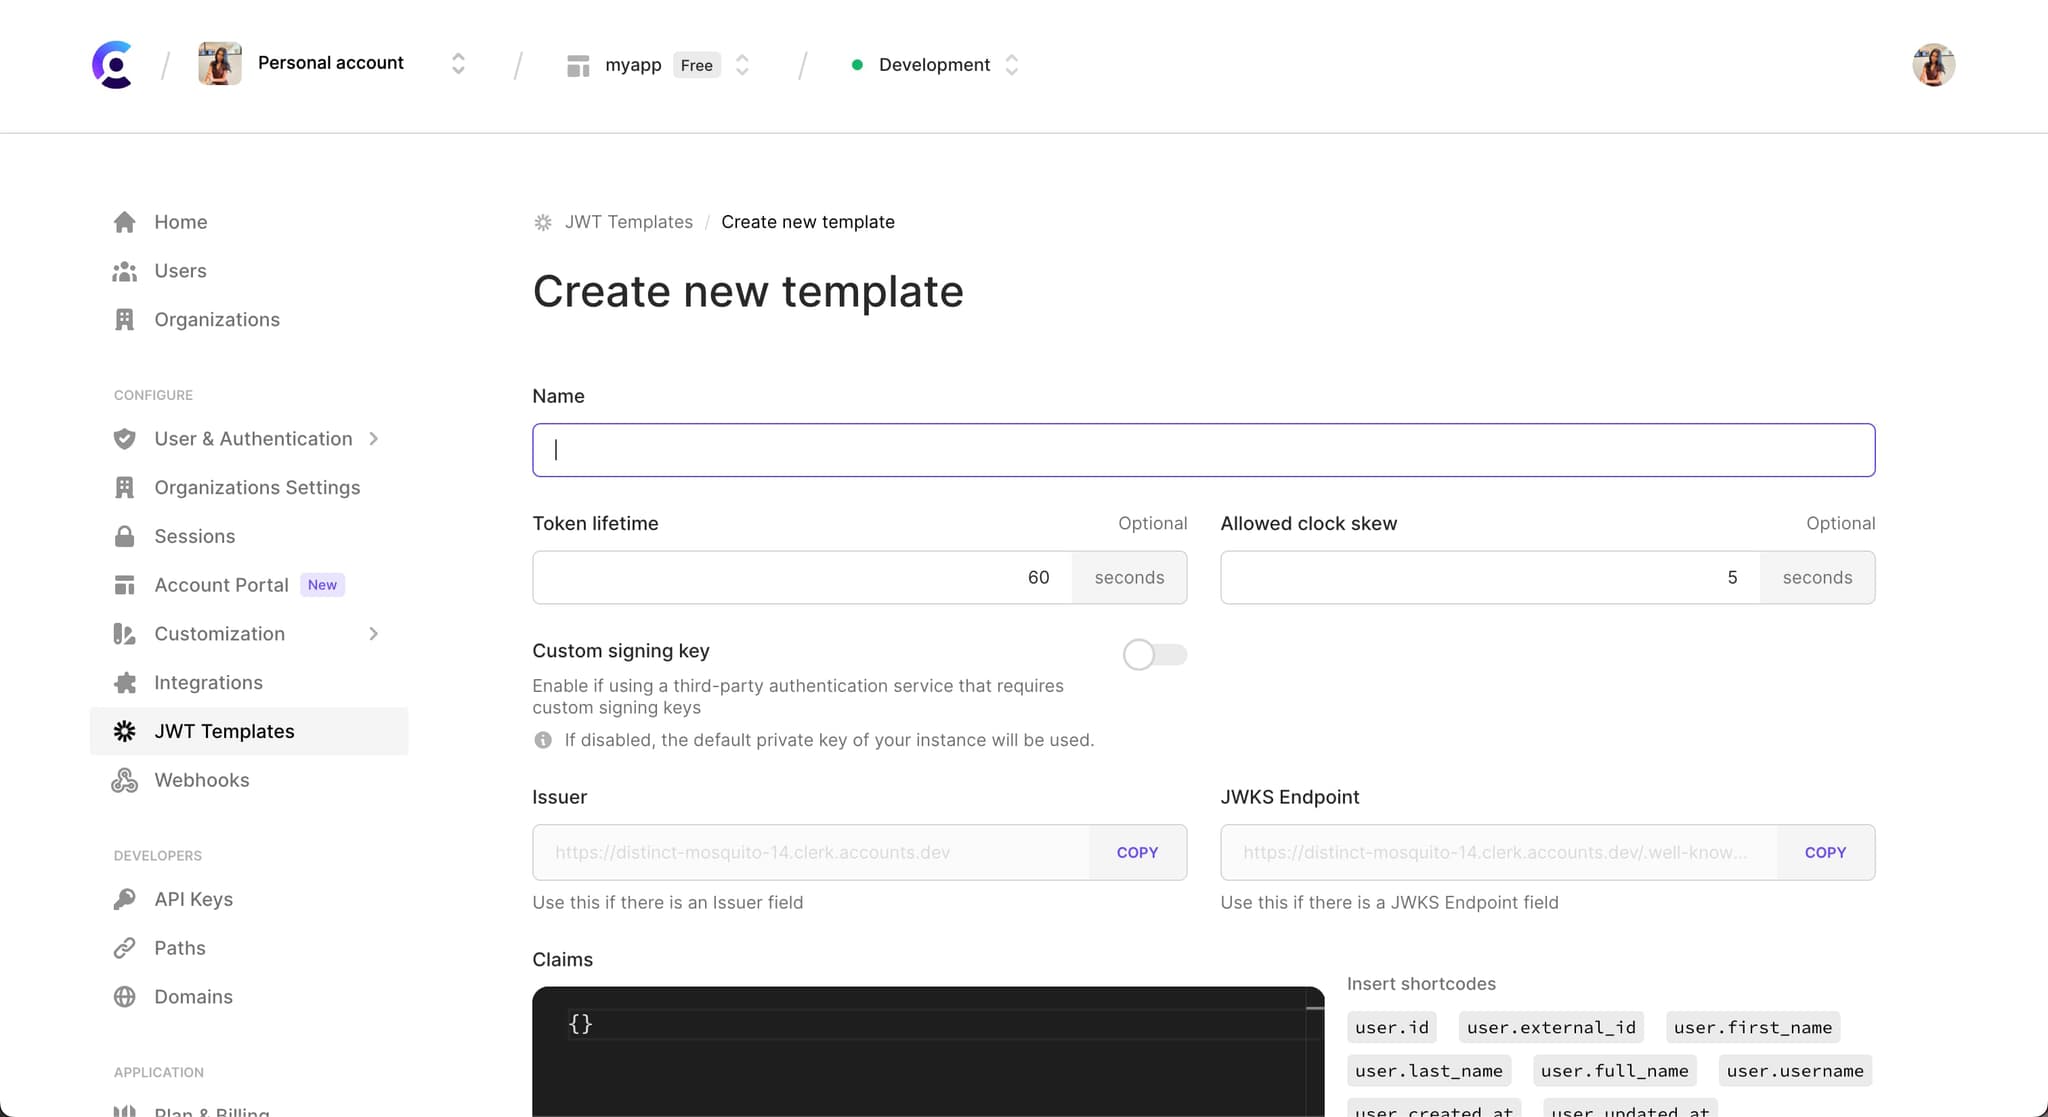
Creating a template
A template consists of the following four properties:
- Template name: a unique identifier for the template. When generating a token, you will have to specify the template to use, using this name. This is a required field.
- Token lifetime: the time in seconds, after which tokens generated with this template will expire. This setting determines the value of the
expclaim (i.e.exp=current_time+lifetime). Default is 60 seconds. - Token allowed clock skew: the time in seconds, provided as a leeway to account for clock skews between different servers. This setting determines the value of the
nbfclaim (i.e.nbf=current_time-allowed_clock_skew). Default is 5 seconds. - Claims: the actual template that's entered into the JSON editor (see screenshot below). A template is essentially a JSON object that describes what the final token claims will look like (shortcodes can be used here). This is a required field.
Templates can be created from the Clerk Dashboard on the JWT Templates(opens in a new tab) page.
Using a template
Tokens are generated by your frontend via Clerk.js, by specifying the template to use.
Assuming you named your template my-template-1, you can generate a token using that template, like so:
try {
  await Clerk.session.getToken({ template: 'my-template-1' }) // => "eyJhbGciOiJSUzI1NiIsImtpZC..."
} catch(e) {
    // handle error
}
The return value is a Promise, since this code will query the Frontend API (clerk.your-site.com) to generate the JWT and fetch it, encoded in Base64.
Tokens can only be generated if the current user is signed in.
Complete example
A more detailed example follows, which demonstrates the full capabilities of JWT Templates, including static claim values, dynamic claim values via shortcodes and automatically included claims.
Given the following user:
- First name:
Maria - Last name:
Doe - Profile picture URL:
https://example.com/avatar.jpg - Clerk ID:
user_abcdef123456789 - Email address (verified):
maria@example.com - Phone number: (not provided)
- Public metadata:
{ "profile" : {"interests": ["reading", "climbing"] } } - Unsafe metadata:
{ "foo" : { "bar": 42 } }
And given the following template (comments added here for clarity):
{
    // static values
    "aud": "https://my-site.com",
    "version": 1,
    "foo": { "bar": [1,2,3] },

    // dynamic values
    "user_id": "{{user.id}}",
    "avatar": "{{user.image_url}}",
    "full_name": "{{user.last_name}} {{user.first_name}} ",
    "email": "{{user.primary_email_address}}",
    "phone": "{{user.primary_phone_address}}",
    "registration_date": "{{user.created_at}}",
    "likes_to_do": "{{user.public_metadata.profile.interests}}",
    "unsafe_meta": "{{user.unsafe_metadata}}",
    "invalid_shortcode": "{{user.i_dont_exist}}"
}
Using the above template, generating a token for the aforementioned user would result in roughly the following claims:
{
    "aud": "https://my-site.com",
    "version": 1,
    "foo": { "bar": [1,2,3] },
    "user_id": "user_abcdef123456789",
    "avatar": "https://example.com/avatar.jpg",
    "full_name": "Doe Maria",
    "email": "maria@example.com",
    "phone": null,
    "registration_date": 1227618844,
    "likes_to_do": ["reading", "climbing"],
    "unsafe_meta": {
        "foo" : {
            "bar": 42
        }
     },
     "invalid_shortcode": "{{user.i_dont_exist}}",

     // default claims, included automatically
    "iat": 1639398272,
    "nbf": 1639398220,
    "jti": "ab293jfirnbmc90qhjwen21",
    "exp": 1639398300,
    "iss": "https://clerk.my-site.com",
    "sub": "user_abcdef123456789"
}
Customizing session tokens
JWT Templates can also be used to customize your instance's session tokens. Refer to Session token customization for more information.