

Sign-in options
Clerk provides a large selection of options for managing your user's sign-in experience. Clerk makes it easy to customize the way signing in works in your application, whether your users will be authenticating with Passwords, Magic Links, One-time Passcodes, or through a Social OAuth provider.
For more information about the steps required for a user to sign in, see the sign-in flow documentation.
You can create your sign-in flow with Clerk's Account Portal pages or prebuilt components. If you need more control over your flow, you can build your own by using React hooks or by using the methods of the SignIn object.
Getting started
When a new application is created, you will be presented with the following screen:
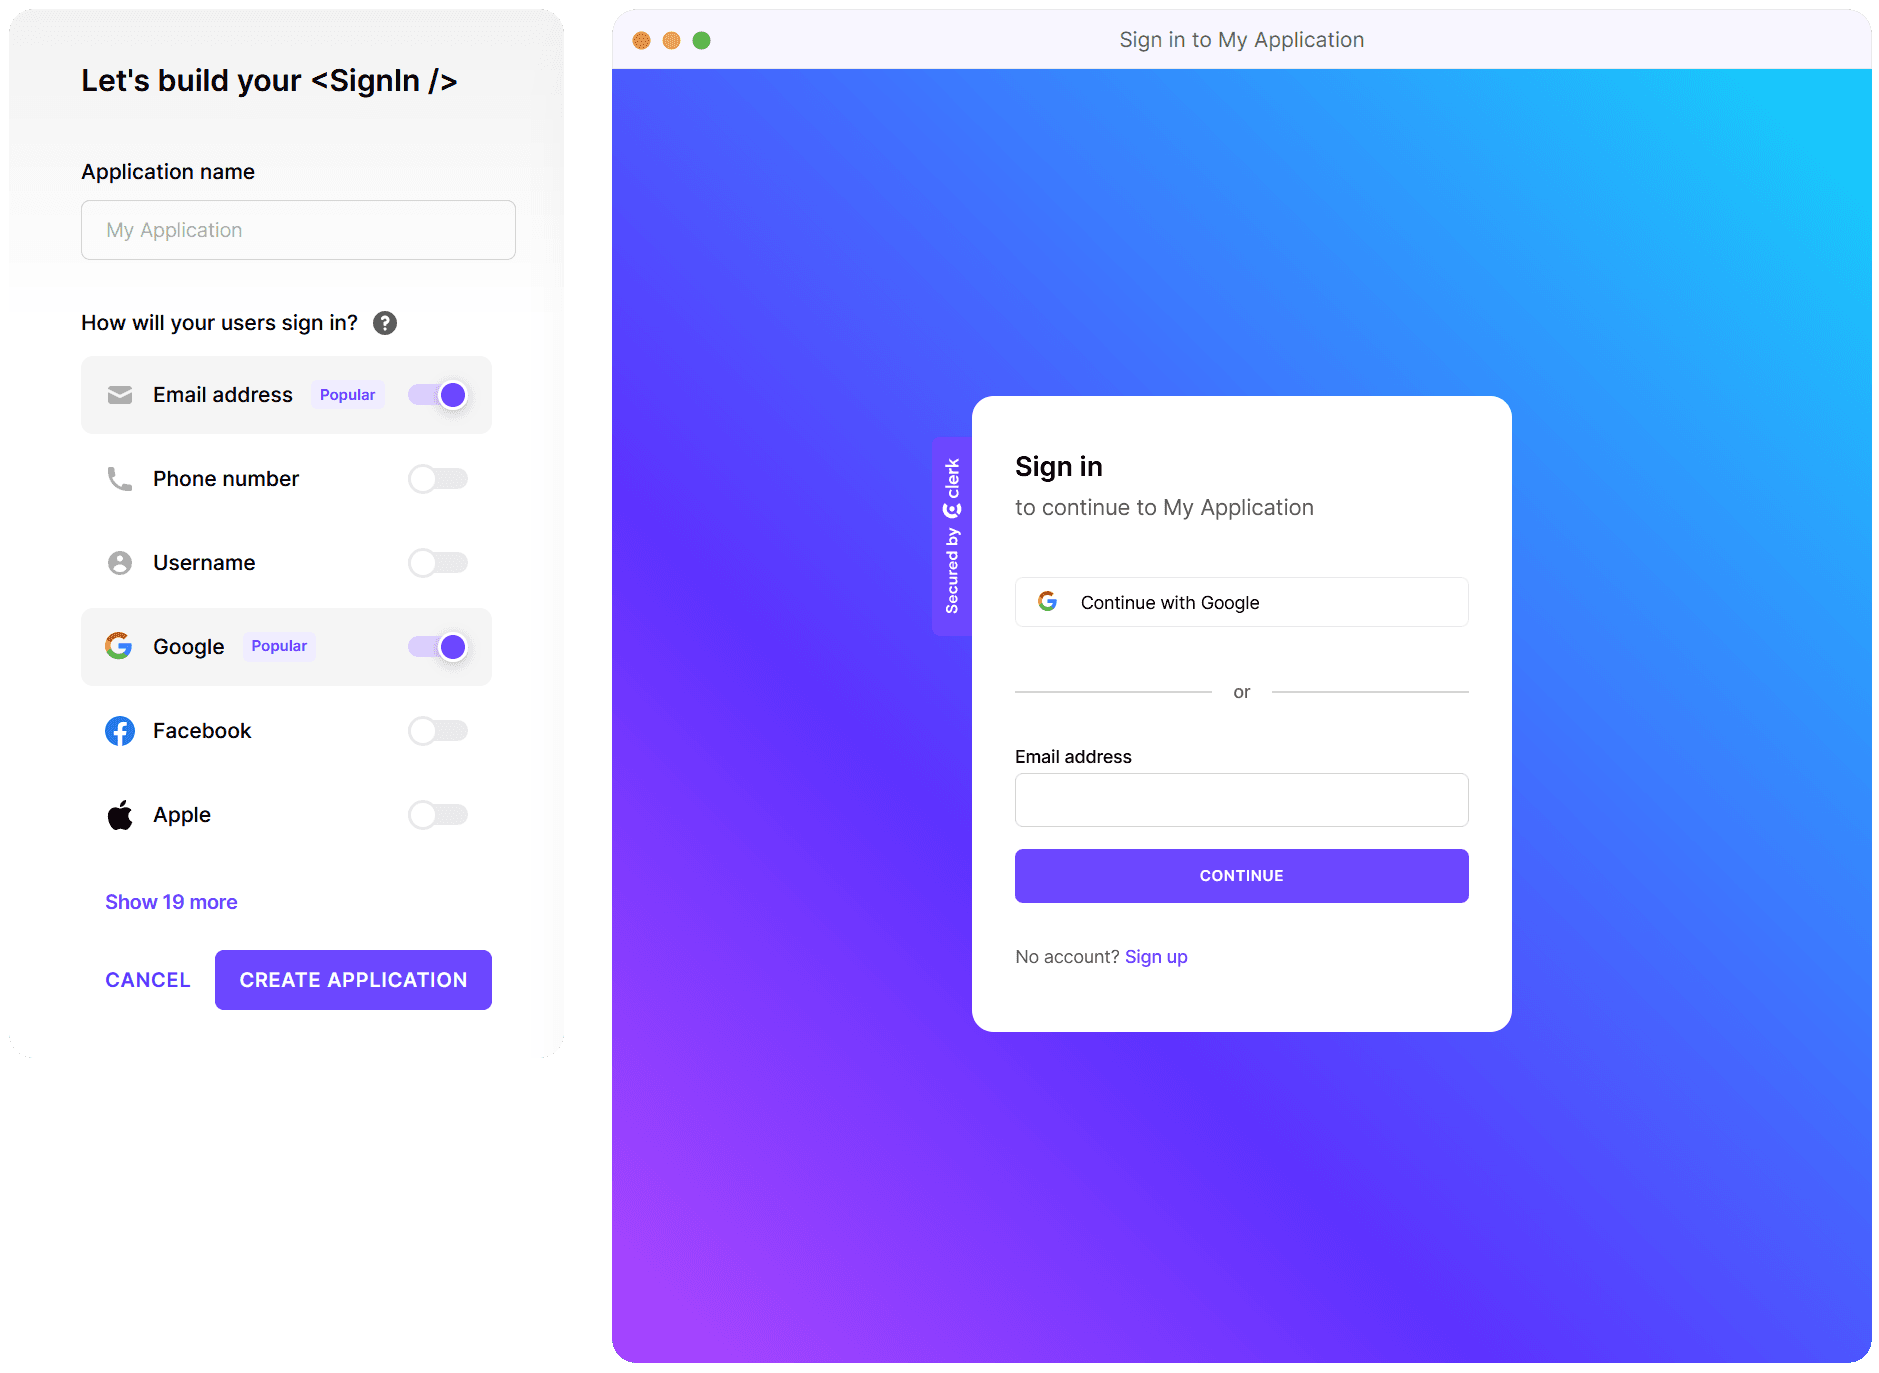
From this menu, you can select the key sign-in information that your users will be providing. There are three main sections:
Identifiers
Identifiers are how your application recognizes an individual user.
- Email address
- Phone number
- Username
Authentication strategy
The authentication strategy refers to whether your application will rely on passwords or a passwordless method of authentication.
- Password
- Passwordless
- One-time password (OTP) - To sign in, the user will receive a code to their email or phone.
- Magic Link - To sign in, the user will click a link sent to their email.
Connected accounts
Connected accounts are third-party sources used to authenticate your users.
Once you've selected the first methods you would like to try, click Create Application. If you're not sure about what you want to use, don't worry. You can change any of these settings from the Clerk Dashboard later on.
How to update sign-in options
If your initial sign-in choices aren't working out or if you want to add more options for your users, you can make changes by navigating to the Clerk Dashboard and opening the User & Authentication drop down. From there, you can make changes to the necessary settings. For example, if you decide you would like to add GitHub as a social login provider, you can do so by navigating to the Social Connections(opens in a new tab) page and toggling on the GitHub provider.
Sign-in examples
Lets take a look at a few of the different sign-in options and how they can be combined to fit your application's needs.
Allow only email address as a sign-in option
Let's imagine that you want to require your users to sign up and sign in with their email. You want to make sure the email they provided is verified before they can sign in. After their email is verified, users can sign in via passwordless methods: by either clicking a link or entering a one-time code sent to their email.
Allow users to sign in using their email
Ensure that Email address is enabled as an identifier. In the Clerk Dashboard, go to User * Authentication > Email, Phone, Username(opens in a new tab). The toggle next to Email address should be on. If it's not, toggle it on and select Apply Changes. Users can now sign up and sign in with their email.
Configure email address authentication and verification settings
Select the gear symbol next to Email address to open up the configuration settings.
A modal titled Email address should open. At the bottom of the modal, there is a section titled Verification methods. You can check the boxes next to Email verification link and Email verification code. Having all of these options toggled on will require users to provide an email on sign-up, require them to verify their email, and will allow them to verify their email with either a link or a code sent to their email.
Allow users to sign in with an email link or one-time code
In the Clerk Dashboard, go to User & Authentication > Email, Phone, Username(opens in a new tab). In the Authentication strategies section, toggle on Email verification link and Email verification code. This will allow users to sign in with either a link or a code sent to their email.

Finished!
Now, when a user signs up or signs in to your application, Clerk will send a verification link or code to the user's email.
For more information on one-time codes, see Clerk's detailed guide.
Allow only phone number and SMS code as sign-in options
Phone number identifiers and SMS verification are Premium features that are only available on some plans. However, you can use these features in development instances for testing purposes. For more information, go to the Clerk Dashboard and navigate to the Plan & Billing(opens in a new tab) page.
Let's imagine that your application is going to be exclusively used by people on their phones. You want to collect the user's phone number as the identifier, and you want the user to sign in to your app by entering a one-time code sent via SMS to the user's device.
Allow users to sign in using their phone number
Ensure that Phone number is enabled as an identifier. In the Clerk Dashboard, go to User & Authentication > Email, Phone, Username(opens in a new tab). The toggle next to Phone number should be on. If it's not, toggle it on and select Apply Changes. Users can now sign up and sign in with their phone number.
Note how the toggle for Email address is off, because in this example, your application is prioritizing a mobile-first approach.
Configure phone number authentication and verification settings
Select the gear symbol next to Phone number to open up the configuration settings.
A modal titled Phone number should open. Because in this example, your application is mobile-first, you should have all of these options toggled on. Having all of these options toggled on will require users to provide a phone number on sign-up, require them to verify their phone number, and will allow them to verify their phone number with a code sent to their phone.
Allow users to sign in with an SMS code
In the Clerk Dashboard, go to User & Authentication > Email, Phone, Username(opens in a new tab). In the Authentication strategies section, toggle on SMS verification code. This will allows users to sign in with a code sent to their phone.

Finished!
Now, when a user signs up or signs in to your application, Clerk will send a verification code to the user's phone.
For more information on one-time codes, see the detailed guide.
Allow only social OAuth and Web3 sign-in options
Let's imagine that you want your users to sign in only with Social OAuth or with a connected Web3 account.
Disable email and password as sign-in options
Users won't need an email or password, so you can turn those off. In the Clerk Dashboard, go to User & Authentication > Email, Phone, Username(opens in a new tab). Toggle off Email address and Phone number. Select Apply changes in the bottom right corner.
Enable social connections as sign-in options
In the Clerk Dashboard, go to User & Authentication > Social connections(opens in a new tab).
Select the OAuth providers that will be used to authenticate your users, such at GitHub or Google.
Enable Web3 as a sign-in option
In the Clerk Dashboard, go to User & Authentication > Web3(opens in a new tab). Toggle on the Web3 provider. Currently, Clerk supports MetaMask.
Finished!
Now, when a user signs up or signs in to your application, users can do so with the social provider you selected, or with Metamask. For more information on setting up different social providers, see the Social Connections guide.